Info

A working photographer based in Atlanta, Georgia.

+ high-res version

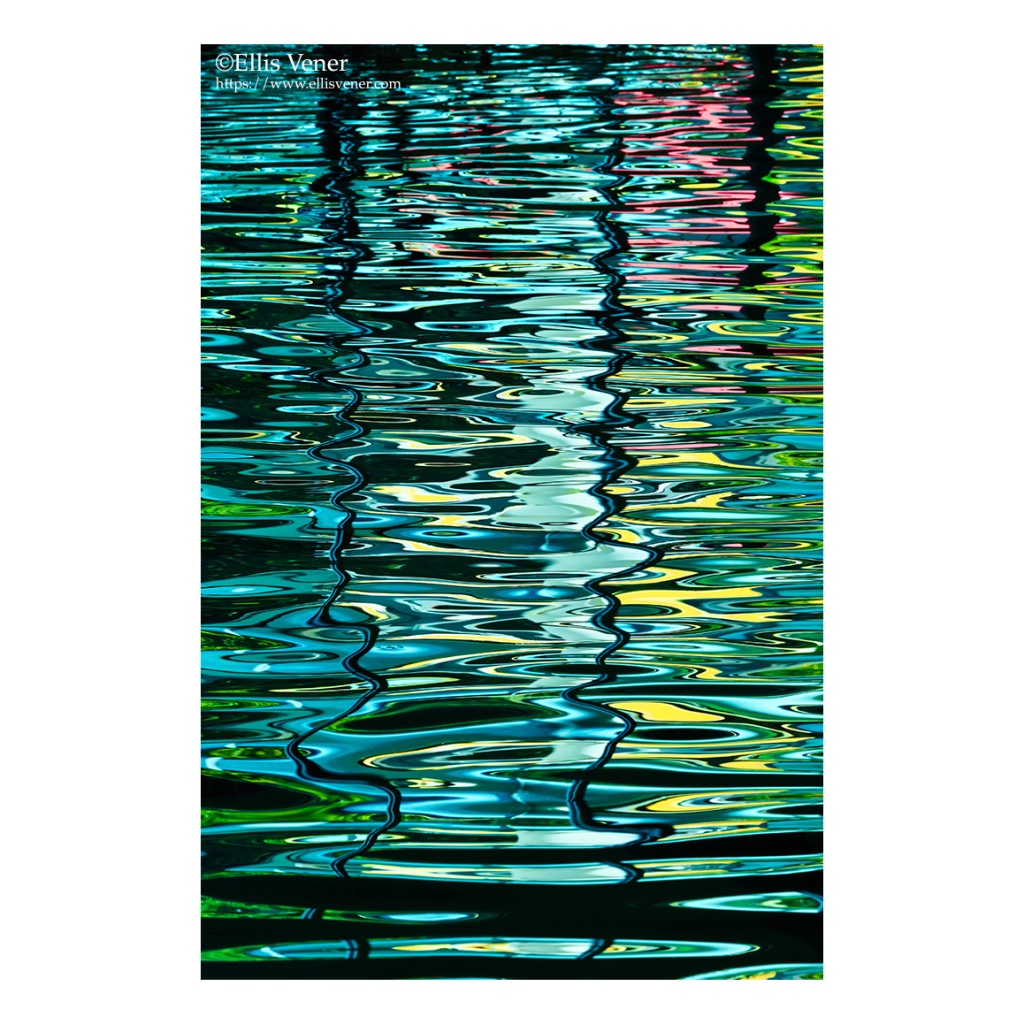
Light over water

Light on Water: Nikon Z7 with AF-S Nikkor 70-200mm f/2.8E FL ED VR

I made this photograph at an indoor pool near Atlanta towards the beginning of a day-long water #KAP7 polo clinic.

What was I thinking about when I made it? As always I thinking about and looking for light and color. I was also being fascinated by the way the reflection of the rigid euclidian geometry of the window frames and the fluid ripples in the pool interacted with each other, and how the resulting multiple angles of incidence and reflection formed continuously shifting patterns of color, light, and shadow.

But mostly I was just feeling the pleasure of seeing something beautiful.

Exposure: ISO 400, ƒ/16, 1/125th

Equipment: Nikon Z 7 camera (now replaced by a Nikon Z 7II), Lens: AF-S Nikkor 70-200mm f/2.8E + Nikon FTZ adapter. Raw Processing: Capture One Pro 21.

©Ellis Vener|

08 Aug 2021

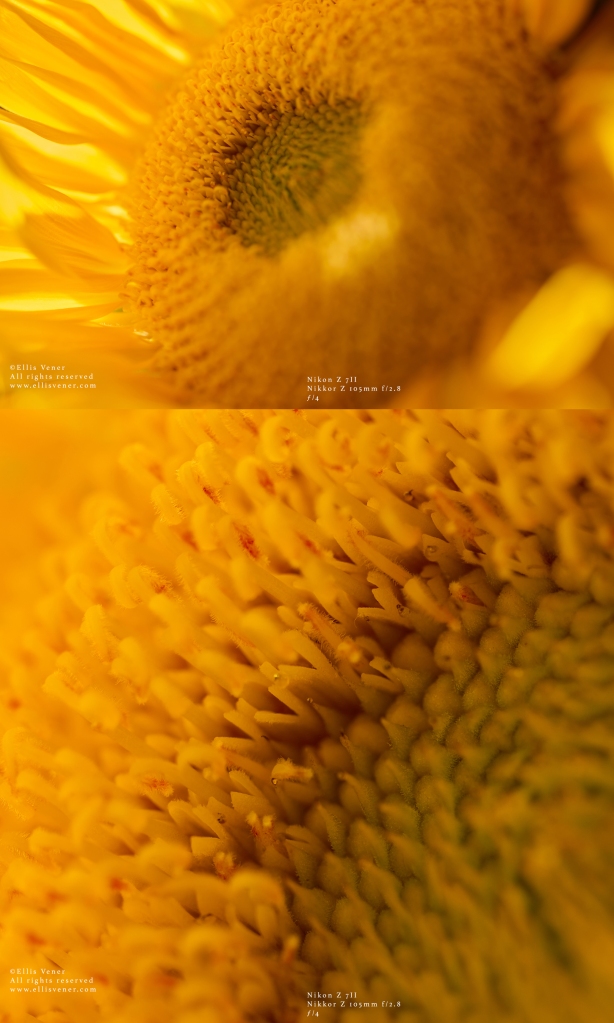
Shortly after taking delivery of the new Nikkor Z 105mm f/2.8 MC lens, I made this series of photographs to test its diffraction and bokeh characteristics using the 45mp Nikon Z 7II camera in a real-world situation.

After manually focusing the lens, I locked focus and made a series of exposures. All exposures were made in aperture priority with the camera set to ISO 64. The camera was mounted on a ProMediaGear TR344L tripod with a Really Right Stuff BH-55 tripod head.

The 14-bit losslessly compressed NEFs were processed in Capture One Pro 21, and the composite full-frame + full resolution cropped images were created in Adobe Photoshop CC 2021. The cropped views are roughly centered on the part of the flower I focused on.


At normal focusing distances, the f-stop scale runs from f/2.8 to f/32 but with macro capable lenses at very short camera to subject distances, the maximum effective f-stop gets smaller (at the distance I focused for in this series, the maximum effective f-stop decreased (from f/2.8 to f/3.3) as does the minimum effective f-stop (f/32 to f/40.)
The f/stop readings are from the camera settings EXIF data.

I was pleasantly surprised to see how sharp the lens could render detail down to the effective aperture of ƒ/32, but even at a moderate print size like 10×15, f/40 remains usable. Usually, lens resolution really starts to fall apart by f/16 or f/22, even with other high-quality macro lenses I have used.

Bokeh, the the transliteration of the Japanese language term for how a lens renders out of focus areas, remains smooth all the way down to ƒ/32 but starts to get a just little choppy at minimum aperture. But what if you want even greater depth of field? You need to use a computational photography technique called “focus stacking.” I will cover that in the next post.


Giant Sunflower still life Atlanta, GA – 06-Aug-2021, at ƒ/3.3
Giant Sunflower still life Atlanta, GA – 06-Aug-2021, at ƒ/4
Giant Sunflower still life Atlanta, GA – 06-Aug-2021, at ƒ/5.6
Giant Sunflower still life Atlanta, GA – 06-Aug-2021, at ƒ/8
Giant Sunflower still life Atlanta, GA – 06-Aug-2021, at ƒ/11
Giant Sunflower still life Atlanta, GA – 06-Aug-2021, at ƒ/16
Giant Sunflower still life Atlanta, GA – 06-Aug-2021, at ƒ/22
Giant Sunflower still life Atlanta, GA – 06-Aug-2021, at ƒ/32
Giant Sunflower still life Atlanta, GA – 06-Aug-2021, at f/40

I’ve been using TTP’s new Airport 4-Sight roller case for about a week now. No flights with it yet – that comes next week – but I don’t forsee any problems with it as the size looks right for overhead bins even on commute turbo-props, but I’ve been using it as I work around the city and in clients’ spaces.

What makes it it especially different from other camera cases is that it has 4 independently pivoting wheels on the bottom which makes it very easy to move in and through narrow spaces, or it can be tilted to use as a wide stance standard push or pull roller. It  also rolls well over wet grass and uneven ground & broken up sidewalks. I’m tall, six foot five, and the handle is long enough to be comfortable whether pulling /pushing it on two wheels or steering it using all four wheels.

I’ve been using it loaded  with three bodies ( D800, D800E, D4), three lenses ( 24-70mm f/2.8G Nikkor, 24-120mm f/4G VR II Nikkor, & 70-200mm f/2.8G VR II – the last attached to either the D800 or D800E), three PocketWizard MUltiMAX transceivers, misc. cables, two TTP PocketRocket media wallets, extra batteries , a Hoodman 3.0 Loupe, and odds and ends like an Xrite ColorChecker Passport and a medium size (5×7?) WhiBAL G7 target, extra batteries, & other small etc. items.

When working out of it I like the way it unzips three quarters of the way around with the hinge on the long side when the bag is lying down. The inside of the flap has two nicely sized zippered flat mesh pockets good for documents and things like the WhiBal.

The exterior is a very clean design with no external pockets, except on the top for business cards and maybe a passport.  On the other hand that also means there’s not any attachment points  to bungee cord or strap a tripod to it  unless you cinch it to the handles.

Construction seems to be up to Thinktank Photo’s usual standards. After a week’s use I like it more than I thought I would and believe it to be a great design for a working photographer who doesn’t carry a huge camera kit with them.

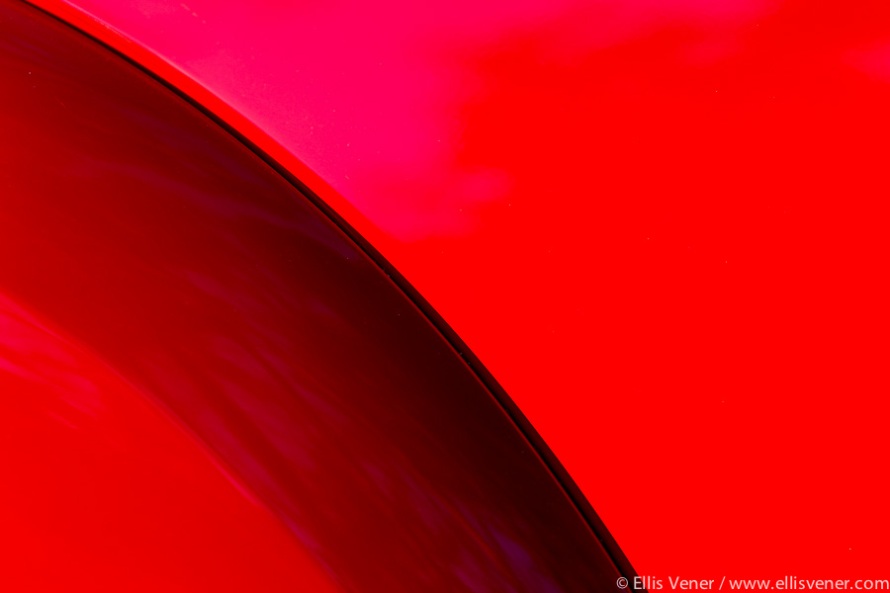
Sometimes you just have to forget what the software can do and just go out and shoot and process it as straight as you can. this is a detail of car that was parked next to me in a lot yesterday afternoon. Sunlight and the car’s color made it  about as red saturated as you can get. I spent about 5 minutes and 30 frames exploring the curves. he bluish magenta patch towards the upper left is a reflection of the sky. The processing chain was short: Just basic capture and output sharpening and a mild dose of Clarity in Lightroom 4.Image

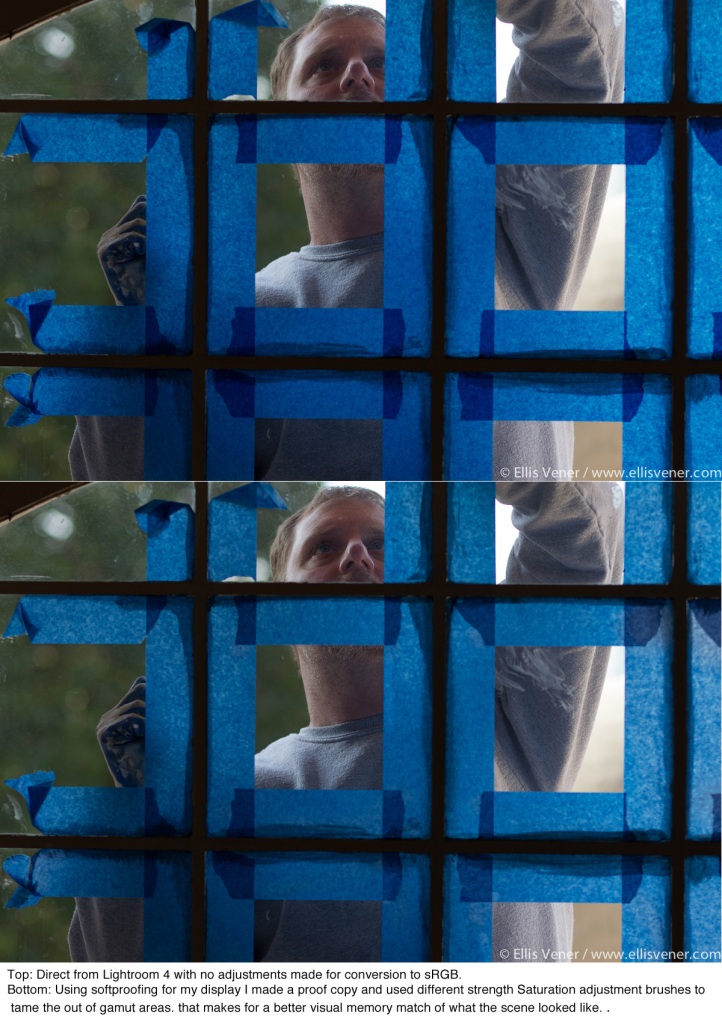
This first composite is made from 4 screen shots. I am soft proofing to sRGB working space. The caption in each is self-explanatory.

This next composite demonstrates the difference between exporting as a JPEG using the sRGB workign space without taking care of the out of gamut areas and how using various strengths and radii of Saturation Adjustment brushes on the out of gamut areas.

more on the Nikon D800 based on some pixel peepinghttp://chsvimg.nikon.com/lineup/dslr/d800/img/sample01/img_01_l.jpg

I just opened this Nikon supplied image in Photoshop to see the Camera Data. See the attached screen shot.

At this point we don’t know if the photo was shot as a JPEG (and was what compression level, color space, etc.) or as non-compressed, lossly compressed, or lossy compressed 12 bit or 14 bit per channel NEF file, and if it was originally a NEF, how it was processed. The original was processed in Capture NX 2.3.0 W software and what level of JPEG compression (or possibly multiple JPEG compressions were used to prep the file for internet distribution.

For Epson printers: At 360ppi the non-interpolated print size is 20.444 x 13.644 inches, but as been proven to most people’s satisfaction the Epsons can do a damn fine job with Luster and gloss papers with files @ 180ppi and that yields a 40.889 x 27.289 inch print – but of course how good the print is will depend on the skills of the person making the print.

If you print at 300 dpi (Canon and I believe HP) you get a 24.533 x 16.373 inch print. With my Canon iPF 6300 imagePROGRAF I feel the bottom limit before start to see printing process artifacts is in the 200-225dpi range.
I really want to know both the image processing and JPEG compression parameters. I suspect some fine detail is being lost in the JPEG compression process. As the late Bruce Fraser pointed out “Difference is detail” and both JPEG compression and using only 8 bit per channel (required by JPEG compression) both forcefully eliminates close differences.

Nikon D800 preview

©Ellis Vener for Professional Photographer Magazine

Prior to the official launch of the 36mp Nikon D800, Lindsay Silverman of Nikon came by PPA’s office to let Joan Sherwood and I have a quick hands on demonstration with a “ready for production” prototype. While we were not allowed to keep any of the shots we made with the prototype as “the firmware is not quite finalized”, I can share my basic immediate impressions.

Physicality /ergonomics:

The first thing you notice is the size of the camera. Without the optional grip with extra batteries and vertical release, in the hands it feels like a slightly beefed up version of the now venerable D700. Without actually sitting a D700 down beside it, the body felt roughly the same height and length but slightly deeper and maybe a little heavier.

The control layout on the back of the camera, in the menus, and on the right hand side of the pentaprism is another evolutionary step in the Nikon’s DSLR evolution. The layout is much like the D700 and D7000. New on the camera’s back side is a separate button for activating Live view. Here is a switch around the button to go from Live View for stills to video mode. The meter patterning control  is now a small crown type three position (Spot, Matrix, and Center-weighted) switch surrounding the AE-L / AF-L lock button.

The controls on the top deck to the left of the pentaprism are different with a couple more options, again not a huge change.

On the front of the camera the focus mode switch has been simplified to just two options, Auto-focus and Manual focus.

The D800 uses the same EN-EL15 battery as the D7000. This will make life easier if you use the APS-C format D7000 as a second camera.

As with the D4 once again Nikon goes with a mixed media card strategy paralleling Canon’s 1D and 1Ds cameras : A slot for CF (Type I up to UDMA-7 compliant CompactFlash) media and one for SD media . The SD slot can handle standard SD, SDHC, and SDXC memory cards.

Exposure compensation settings range from +5 to -5 EV in 1/3rd, ½ and full stops and the camera can be set to auto bracket anywhere from two to nine exposures also in third, half and full stop increments.

Nikon continues on with the iTTL flash exposure control system, and X-sync is 1/250th   with an option (presumably just for Nikon Speedlights to go up to 1/3320th before switching into FP sync mode. Flash exposure compensation runs from -3 to +1 stops in (you guessed it) third, half and full stop increments.

For tethered shooting there is a USB 3.0 connection. Why they did not go with a faster FireWire 800, Thunderbolt, or gigabit Ethernet connection (as with the D4) is anyone’s guess, but unless they know something that we commoners don’t know that isn’t great news for Mac computer users.  You can also stream an uncompressed feed to an external recorder through the high resolution HDMI output bypassing the media cards in the camera.  The HDMI ported signal can also be viewed on an external monitor in parallel with the Live view controls on the camera’s 3.2-inch (diagonal) 921,000 dot LCD.

The built in electronic level now has an indicator for pitch (fore/aft) as well as lateral leveling and these are both now visible in the viewfinder as well as on the rear LCD.

Image Quality:

To state the obvious, both the D800 and D800E have lots of resolution: 36.3 effective MP (out of a total of 36.8) to be exact; in a 7,360 x 4912 pixel array spread over a 24 x 35.9mm Nikon engineered CMOS sensor. More pixels mean you can print larger or at higher resolution for standard sizes without interpolating but also allows for cropping and retaining image quality. If you photograph products or landscapes, or are just not are worried about moiré patterns the slightly more expensive, limited edition D800 E variant with it’s less aggressive anti-aliasing filter may be more to your liking.  A high signal to noise ratio is maintained even at relatively high ISO settings.

Under the hood:

The native sensitivity range starts at ISO 100 and goes up to 6400 with two “Hi range” boosts. Hi 1 takes you to 12,800 and Hi-2 takes you from 12,800 to 25,600. Between ISO 100 and Hi-1 you can move in 1/3rd, ½ and whole stop increments. There is also an ISO 50 equivalent Lo-1 setting.  You can also choose between a couple of Auto ISO setting ranges.

Initial image processing is done through a Nikon’s EXPEED 3 processing engine tuned to the D800 sensor. To rapidly push the 36.3Mp worth of data through the EXPEED 3 system Nikon is using a 16-bit data pipeline with a 14-bit analog to digital (A/D) conversion. Output can take the form of either 12-bit or 14-bit per channel NEFs in uncompressed; losslessly compressed, or lossy compressed form, plus Adobe RGB (1998) or sRGB TIFFs and JPEGs. There are three smaller format options available as well: a 5:4 ratio, a 1:1.2 “crop” and 15.4mp resolution Nikon DX (APS-C) format.  Full frame continuous shooting is up to 4fps.

There is also a built HDR function (for JPEG shooting only apparently, definitely no raw HDR NEFs) which can be set anywhere from a realistic HDR exposure that mimics the look of exposure blending to the extreme and exaggerated effects you get through tone mapping. It works by taking two photos in rapid succession. You get to choose the spread between the two exposures up to 4 stops apart (i.e., the first exposure can be two stops over “normal” and the second one at two stops below normal) the mildest setting is very realistic looking but with additional detail in the low shadows and the brightest non specular highlights, while the more extreme tone mapped variations give you that popular-for-the-moment tortured Goth / candy cane look.

The D800 sports an “enhanced” Multi-Cam 3500-FX AF processing system matched with 51 AF sensor points, 15 of which are cross type sensors. The autofocus range is said to be good down to -2 EV, light so dim that at ISO 100 it would take a 4 second exposure at f/1.4 for a subject to be rendered as medium gray. The system is optimized to recognize and lock on a human face even as it moves across the frame. In our brief tests it did this very well.  One of the methods this is accomplished is by tying the AF system to the new 91,000-pixel sensor used by the new 3D Color Matrix Metering III system. By comparison, the D700’s 3D Color Matrix Metering II system used a 1,005-pixel sensor.

We are nearly out of space but need to mention the video quality briefly. Simply this is the best looking digital video I have seen out of a DSLR, no rolling shutter problems, terrific dynamic range, and very solid blacks. There are multiple video output forms and frame rates.

One more thing: pricing and availability.  Stereo mike inputs are built in along with individual VU meters for each channel. Nikon has set the MSRP for the D800 at  $2,999.95 and the D800E’s MSRP at $3,299.95. The D800 should start showing up on shelves by the end of March with the D800E variant available starting in mid-April.

More info and official specs at more info at press.nikon.com